Introduction
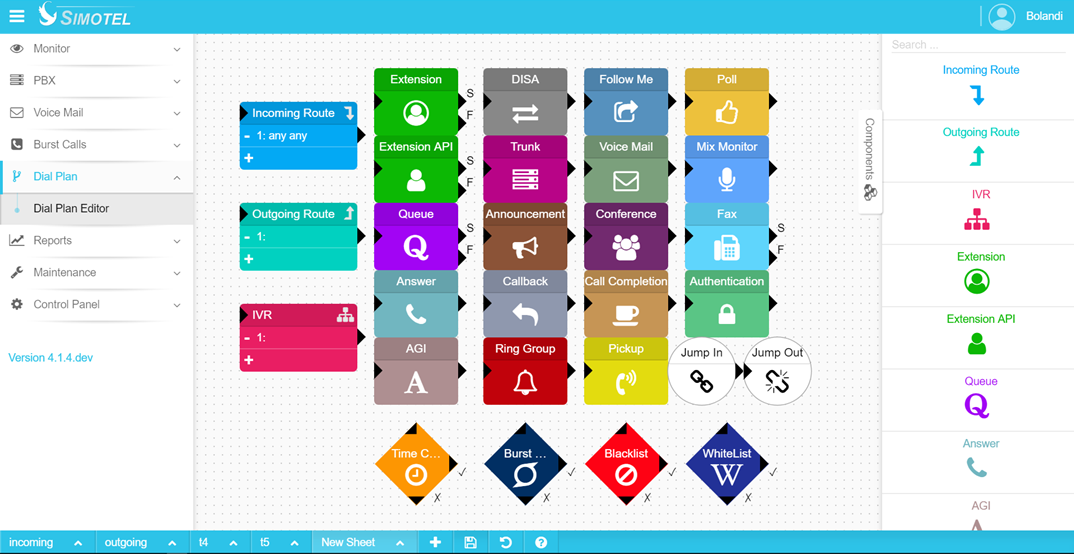
The editor is the main component of the Simotel software. The call flow from the moment of entry to exit in Simotel is planned and implemented using the components available in the editor section. Before familiarizing yourself with the editor components, it is better to first understand the parts and functions of the editor.

Components of the Editor
-
Component Bar: The right sidebar containing all the editor components.
-
Component: Each component is responsible for performing a specific operation in the call path.
-
Design Plot: The white background page of the editor.
-
Search Button: Located in the lower left bar, it allows searching between pages by name (very useful when there are many pages).
-
Pagination: Located in the lower left bar, it allows creating a new page and dividing the call path structure into different pages for ease of implementation.
-
Save Button: Any changes in the monitoring editor environment are local and are only saved and executed by pressing the save button in the system. This button's behavior is global, and changes on all pages are saved.
-
History Button: Displays the history of changes made to the editor. It is possible to revert to previous changes from this location. To register and execute previous changes, the save button must also be applied.
-
Help Button: A tool for guiding the components of the editor.
-
Map: While moving the design plot, a small page is displayed at the bottom of the plot that helps with positioning in the plot. To use it in the dial plan page, press the left mouse button and move the mouse.
Operations in the Editor
-
Drag and Drop: To add a component to the plot, first grab it from the component bar with the mouse and drop it onto the plot.
-
Moving the Plot: Click on the plot and move it.
-
Zooming: Hold the ctrl key and use the mouse scroll to change the zoom level of the plot.
-
Adding a Component to the Plot: By dragging and dropping, the component is transferred to the plot.
-
Copying a Component: Click on the component in the plot page and then click the copy icon above it.
-
Deleting a Component: Click on the component in the plot page and then click the Recycle Bin icon above it.
-
Changing Component Parameters: Click on the component in the plot page and then click the Settings icon above it. In the window that opens, you can change the component parameters.
-
Establishing Connection Between Components: Click on the output of the source component and then click on the input of the destination component. The connection will be established.
-
Deleting Connection Between Components: Click on the connection to change its color. Press the delete key on the keyboard and confirm the delete message.
-
Moving a Component: Press and hold the mouse button on the component name (top bar) and move it.
-
Changing Component Name: Double-click on the component name bar and change the name.
-
Adding Output to a Component: In some components that allow adding rows, click on the ➕ sign at the end. To delete a row, click on the – sign next to the row.
-
Adding a New Page: Click on the ➕ sign in the lower bar of the editor and enter the name of the new page.
-
Backing Up: Click on the 🔼 sign in the lower bar of the editor and select Export.
-
Restoring Backup: Click on the 🔼 sign in the lower bar of the editor and select Import.
-
Saving Page Changes: Click on the 🔼 sign in the lower bar of the editor and select Save.
-
Renaming a Page: Click on the 🔼 sign in the lower bar of the editor and select Rename.
-
Clearing Data: Click on the 🔼 sign in the lower bar of the editor and select Clear.
-
Deleting a Page: Click on the 🔼 sign in the lower bar of the editor and select Delete.
-
Reloading: Click on the 🔼 sign in the lower bar of the editor and select Reload.
-
Clearing Page Content: Click on the 🔼 sign in the lower bar of the editor and select Clear.
-
Searching for a Component in the Component Bar: In the component area at the top of the page, type the desired component name in the search section.